
Wall Thickness, Tolerances and Cavities — The Designer’s Checklist for CNC-Ready Parts
A CAD model can look fully optimized in review and still create expensive problems once machining begins thin walls that chatter, tolerances that force extra passes, cavities a tool can't reach. This guide walks through the wall thickness, tolerance, and cavity decisions that determine whether a design machines cleanly or turns into a redesign cycle.
Introduction
Manufacturability, not raw machine capability, is usually what separates a part that machines cleanly from one that turns into a string of change orders. Modern CNC equipment is accurate enough to hold tight tolerances and cut complex geometry across nearly any industry but no amount of machine capability corrects for a design that ignores how cutting tools, fixtures, and inspection equipment actually interact with a part.
Most production problems trace back to the same root cause: a design optimized for function or appearance without checking how it behaves under real machining conditions. Thin walls chatter under cutting load. Deep cavities restrict tool reach and slow every pass. Overly tight tolerances force extra finishing operations and longer inspection cycles that add cost without adding value.
A production-ready part balances four things at once: structural performance, machining accessibility, inspection practicality, and scalability from prototype to volume production. Getting there means evaluating not just what the geometry looks like, but how a cutter, a fixture, and an inspection probe will each interact with it. Teams that build this thinking into CAD from the start consistently see faster, more stable, more cost-effective production than teams that treat manufacturability as a final check before release.
Why Design for Manufacturability Starts with Geometry Decisions
Many teams treat manufacturability as a final review step before production release something a machinist flags after the fact, if at all. In reality, manufacturability begins the moment the first feature is sketched inside the CAD environment, well before any drawing reaches a shop floor.
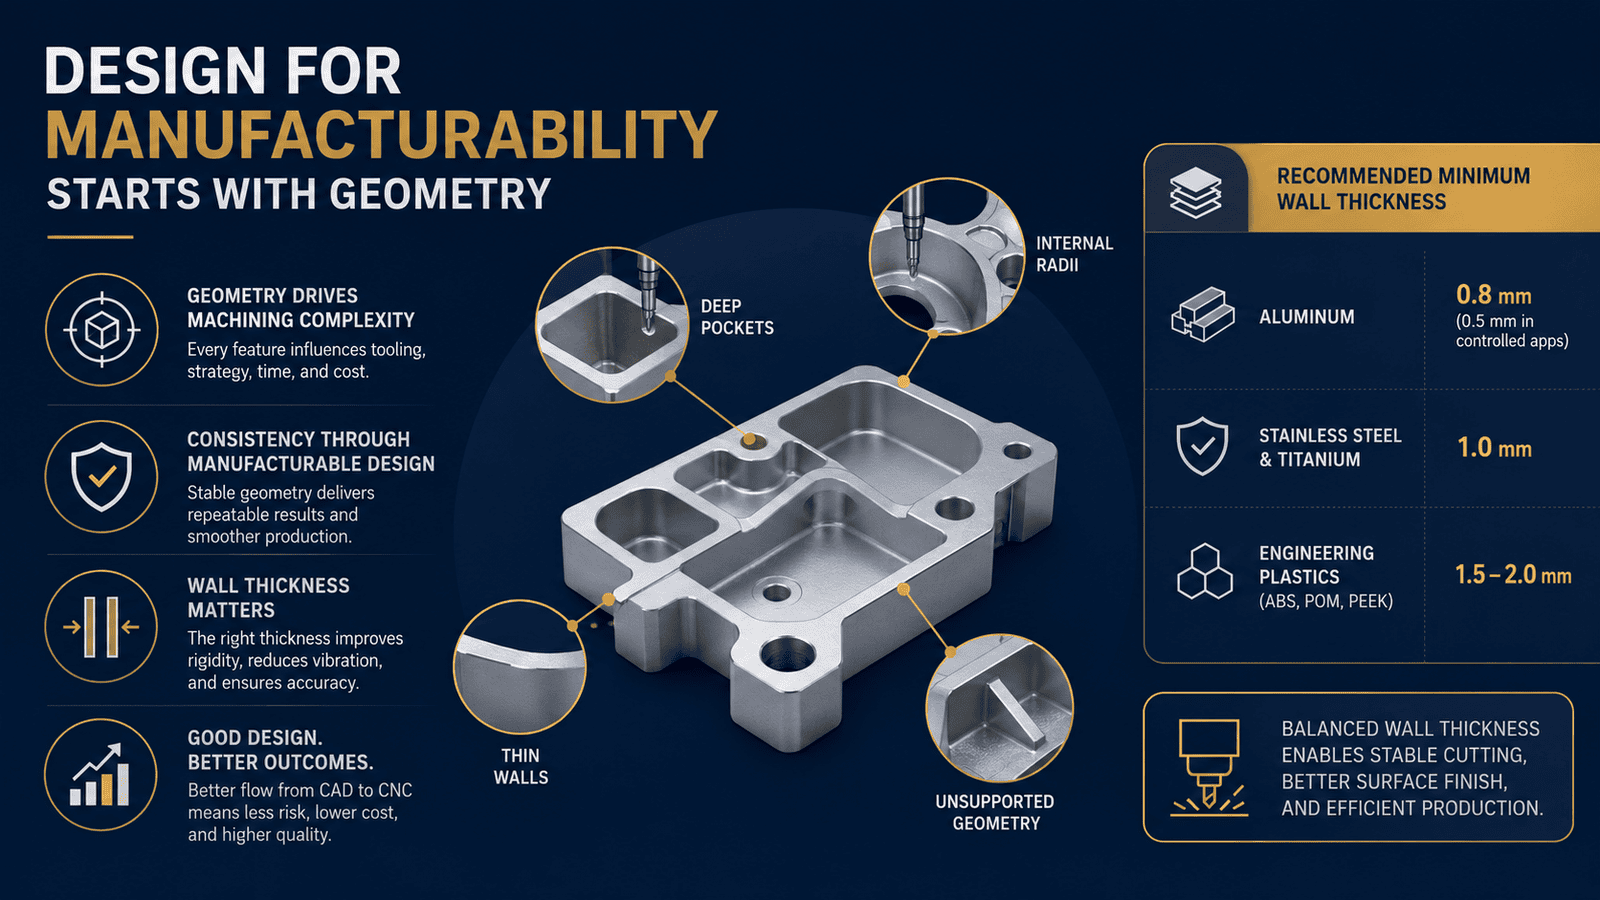
Every feature added to a model directly influences machining strategy, fixture design, cutting stability, inspection accessibility, and overall production efficiency. A pocket sketched deeper than necessary, a corner left perfectly sharp instead of filleted, a wall left thin because it looked fine on screen none of these register as problems in CAD. Each one becomes a real cost once a machinist has to select tooling, plan setups, and hold tolerance against that exact geometry. Even highly advanced CNC equipment cannot machine inefficient geometry economically if the underlying design ignores tooling limitations or how metal actually behaves under a cutting load.
Every pocket, rib, cavity, radius, and internal corner changes how the cutting tool interacts with the material in this way: deep pockets demand long-reach tooling that loses rigidity, small internal radii force slower passes with smaller cutters, and unsupported geometry vibrates and degrades surface finish. As geometric complexity increases, machining time, programming difficulty, and inspection requirements increase right along with it and the payoff for keeping geometry simple isn't only lower machining cost. Stable, well-supported geometry also improves repeatability across production batches and machine setups, so dimensional variation becomes easier to control and inspection results stay more consistent, which matters most once a design moves from low-volume prototyping into repeat production.
Strong DFM practice pushes that awareness back to the sketch stage, reducing unnecessary complexity before production begins and keeping engineering intent aligned with what a machine can realistically deliver.
Wall Thickness Directly Affects Machining Stability
Wall thickness is one of the most important variables in CNC-ready part design because it directly influences rigidity, vibration behavior, thermal stability, and dimensional consistency during machining. Extremely thin walls may deform under cutting pressure, while excessively thick geometry increases material removal time and thermal buildup. This isn't a linear relationship, either a wall's resistance to bending scales with the cube of its thickness, so a 1 mm wall isn't half as stiff as a 2 mm wall, it's roughly one-eighth as stiff. Small reductions in thickness cost far more rigidity than they appear to on a drawing.
For practical CNC machining design, recommended minimum wall thickness values vary by material. Aluminum components can often be machined down to approximately 0.8 mm under standard conditions and as low as 0.5 mm in highly controlled applications. Stainless steel and titanium typically require at least 1.0 mm wall thickness, while engineering plastics such as ABS, POM, and PEEK generally perform best between 1.5 mm and 2.0 mm.
Below these ranges, chatter, spring-back, vibration, and dimensional variation become increasingly difficult to control regardless of machining strategy. Establishing realistic wall thickness targets early improves rigidity, simplifies fixturing, and reduces manufacturing risk. Balanced wall thickness allows the machine to remove material efficiently while maintaining structural stability throughout the machining cycle.
Thin Walls Increase Deflection and Chatter
During machining, cutting tools apply continuous force against the workpiece surface. Thin walls lack the stiffness required to resist those forces effectively. As a result, walls may flex, vibrate, or chatter during roughing and finishing operations. In some cases, unsupported walls move during machining and fail to return completely afterward, creating dimensional variation and poor surface quality.
Thin geometry also complicates workholding because clamping pressure itself may distort the part before machining even begins.
Wall height is equally important. As a general CNC design guideline, unsupported wall heights greater than approximately eight times wall thickness begin to present stability concerns, while aspect ratios exceeding fifteen-to-one often become impractical for conventional machining operations. Beyond these limits, deflection and chatter frequently make dimensional consistency difficult to maintain.
Thin-wall machining often requires specialized work holding strategies to prevent distortion during cutting. Soft jaws, vacuum fixtures, low-force clamping systems, and adhesive fixturing methods are commonly used to support delicate geometries while minimizing deformation caused by fixture pressure.
Excessive Thickness Increases Machining Time
While thin walls create instability, overly thick sections introduce a different problem, since CNC machining is a subtractive process: every extra millimeter of material is volume that has to be physically cut away and cleared as chips, not simply allowed to exist. Large material volumes translate directly into longer roughing cycles, increased spindle load, additional tooling passes, and greater heat generation during machining.
This becomes particularly important in precision CNC machining applications, where thermal expansion may affect dimensional accuracy even after the part has cooled back to room temperature. In many cases, the fix isn't reducing wall thickness everywhere it's replacing an unnecessarily solid section with a pocketed or ribbed structure that keeps stiffness where it's needed and removes mass where it isn't.
Tolerance Strategy Must Match Functional Requirements
One of the most common design mistakes in CNC production is applying unnecessarily tight tolerances across the entire model often a holdover from a default title-block tolerance nobody revisited once the design matured. Not every feature requires extreme precision: a mounting hole with no critical fit, a cosmetic chamfer, or a surface no other part ever touches doesn't need the same tolerance as a bearing bore or a sealing face.
Tolerances should reflect actual functional requirements rather than default engineering assumptions. A strong manufacturable design approach applies tight tolerances only where assembly fit, motion control, sealing surfaces, or mechanical performance genuinely demand them everywhere else, a standard commercial tolerance isn't a compromise, it's the correct engineering choice, because it lets the shop machine and inspect the part at normal speed instead of treating every dimension as equally critical.
Over-Tolerancing Increases Manufacturing Complexity
Holding extremely tight tolerances often requires slower machining passes, additional finishing operations, thermal compensation strategies, and more advanced inspection procedures. For example, tightening a tolerance from ±0.1 mm to ±0.005 mm can increase machining cost by two to five times due to slower cutting speeds, additional finishing passes, thermal compensation requirements, and significantly more inspection effort. Unless a functional requirement truly demands extreme precision, excessive tolerancing often adds cost without adding value.
Material thermal behavior must also be considered. Aluminum expands at approximately 23 µm/m°C, meaning even small temperature changes during machining or inspection can influence dimensional measurements. For precision CNC components, thermal stability becomes an important factor when specifying tight tolerances. Applying aggressive tolerances to cosmetic or non-critical features increases production cost without improving functionality. Designers should prioritize precision strategically rather than universally.
Strong Datum Strategy Simplifies Inspection
Tolerance performance depends heavily on how datums are structured throughout the design which is exactly what geometric dimensioning and tolerancing, under the ASME Y14.5 standard most shops design and inspect against, exists to control. Datums built around a part's actual functional references, rather than whichever surface happened to be convenient to dimension from, keep machining setups and inspection routines aligned with each other.
Poor datum selection does the opposite: it creates inconsistent measurement results between the machinist's setup and the inspector's fixture, and complicates rework when a feature falls just outside tolerance. When teams prepare CAD for manufacturing with a clear, function-based datum structure, quality control becomes significantly faster and more repeatable across every part in the batch.
Cavity Design Must Support Tool Accessibility
Internal cavities are common in housings, lightweight structures, and functional mechanical components. However, cavity geometry must always account for practical tooling limitations, and many machining problems occur simply because internal features exceed realistic tool access capability.
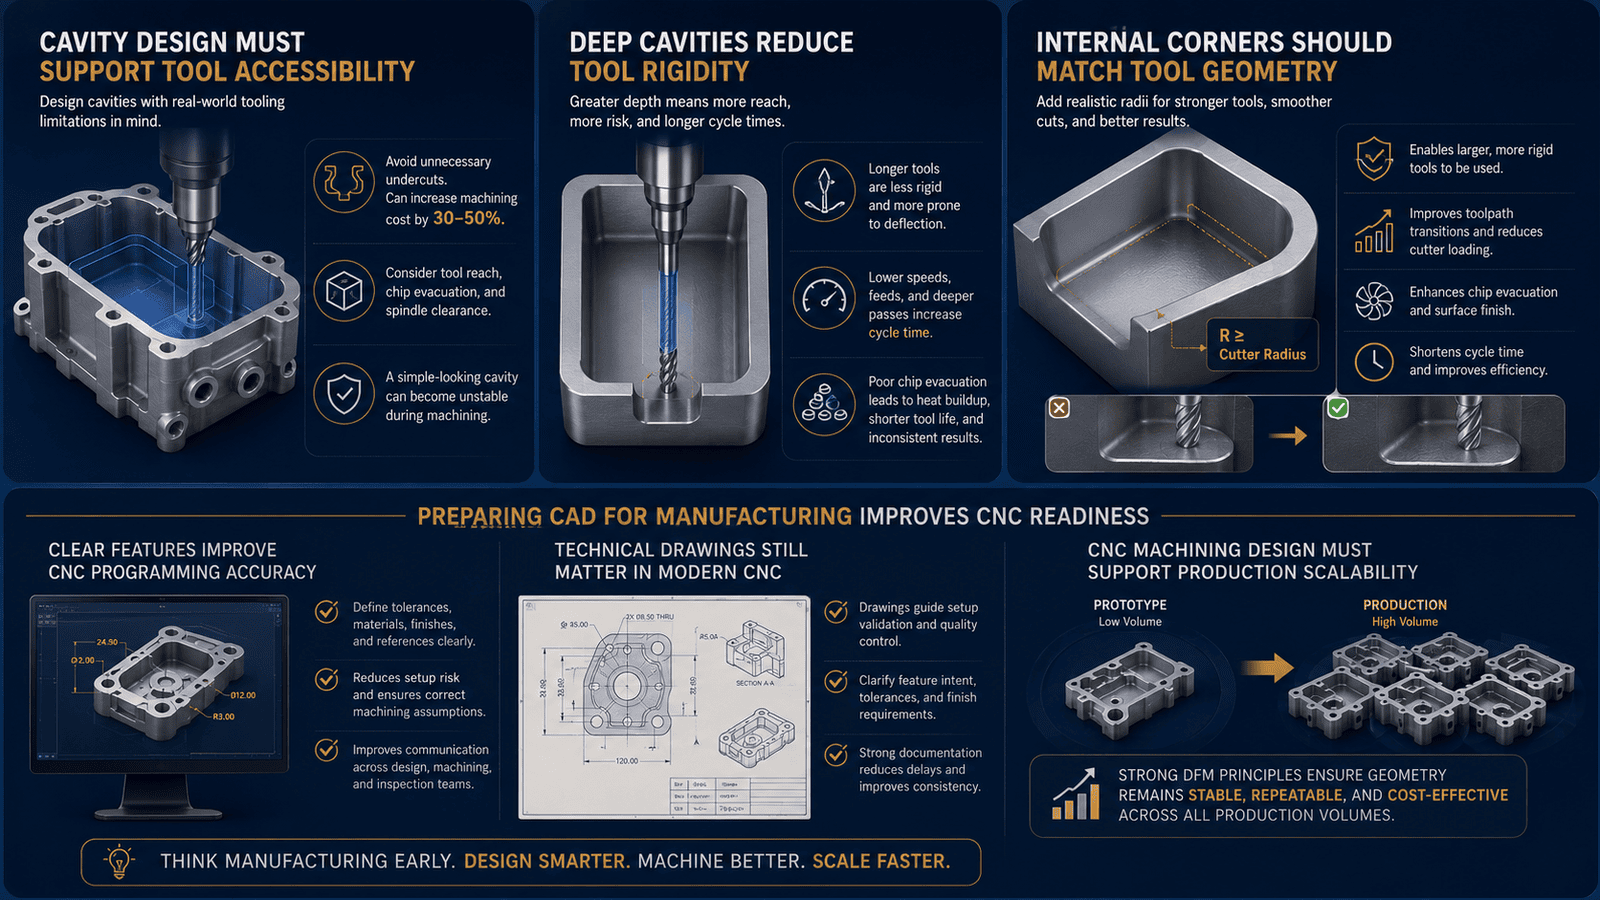
Features such as undercuts often require specialty tooling, additional machine setups, or multi-axis machining strategies. In many production environments, undercuts can increase the machining cost of the affected feature by approximately 30–50 percent compared with a standard pocket of similar size and depth, so evaluating whether an undercut is functionally necessary can have a meaningful impact on production economics. A cavity that appears simple inside CAD may become unstable once cutter reach, chip evacuation, and spindle clearance become restricted during machining problems that rarely show up in a static 3D model and only surface once a programmer starts planning the actual toolpath.
Deep Cavities Reduce Tool Rigidity
As cavity depth increases, cutting tools require greater reach, and longer tools are naturally less rigid and more susceptible to vibration and deflection the same cantilever effect that makes a long ruler wobble more under fingertip pressure than a short one.
The widely used rule of thumb is to keep pocket depth at or below four times the tool diameter; beyond that ratio, deflection, chatter, and chip evacuation all become significant risks. The cost of ignoring this compounds quickly: a pocket machined at six times the tool diameter can take roughly four times longer to finish than the same pocket at three times the diameter, because the only way to hold accuracy at that reach is to cut lighter passes at reduced speed.
Deep cavities also complicate chip evacuation on their own, since chips have farther to travel out of the cut which raises heat concentration at the tool tip and shortens tool life even before deflection becomes the limiting factor.
Internal Corners Should Match Tool Geometry
Standard CNC milling tools are round, meaning perfectly sharp internal corners are not naturally machinable.
Ignoring this limitation forces secondary processes such as EDM machining or manual finishing. Adding realistic corner radii allows larger, more rigid tools to enter the feature efficiently while improving overall manufacturability.
A useful CNC design guideline is to size internal corner radii to at least 1.3 times the cutter's radius for example, a 2.6 mm corner radius for a tool with a 2 mm radius rather than leaving corners at the bare minimum a tool could technically reach. This allows smoother toolpath transitions, reduces cutter loading, improves chip evacuation, and shortens machining cycle times. Larger pocket radii also let stronger, more rigid tools stay engaged consistently throughout the cut instead of stepping down to a smaller, more fragile one just to clear a corner.
This becomes increasingly important during production scaling, where tooling efficiency directly affects lead times and machining cost.
Preparing CAD for Manufacturing Improves CNC Readiness
A visually clean CAD model does not automatically mean a production-ready one the two are judged by entirely different criteria. A model can be dimensionally perfect, fully constrained, and free of geometry errors, and still leave a machinist guessing about which surfaces matter, what finish is expected, or whether a radius is functional or just how the designer happened to draw it.
Preparing CAD for manufacturing means understanding how that geometry translates into toolpaths, fixtures, machining strategy, inspection routines, and shop floor communication and then making those translations explicit rather than leaving them to be inferred. Ambiguous dimensions, overlapping geometry, undefined radii, or incomplete manufacturing notes create exactly the kind of confusion that increases setup risk and leads to incorrect machining assumptions during production. The goal is to remove that ambiguity before machining ever begins, because every assumption a machinist has to make on your behalf is also a chance for that assumption to be wrong.
This is where technical drawings still earn their place, even inside an advanced CAD workflow built around model-based definition. Machinists and inspection teams depend heavily on drawing interpretation during setup validation and quality control, and a drawing that clearly calls out tolerances, datums, and surface finish under a standard like ASME Y14.5 removes exactly the kind of ambiguity that turns into a phone call mid-production. Well-prepared documentation clear tolerances, material requirements, surface finishes, and functional references improves communication between design teams, machinists, and quality inspectors, and that consistency matters even more once a part is being sourced from more than one shop.
CNC Machining Design Must Support Production Scalability
A part that runs successfully during prototype machining can still struggle once it moves into scaled production, because prototype success and production efficiency get validated against entirely different pressures. A single prototype can absorb a slow setup, a hand-fit fixture, or an operator compensating for a marginal feature in real time none of which survives contact with a production run that needs to repeat the same result hundreds or thousands of times without that kind of individual attention.
Strong manufacturing DFM principles exist precisely to close that gap, ensuring geometry remains stable and repeatable across both low-volume and high-volume machining environments rather than only working under the more forgiving conditions of a one-off build. Prototype success alone was never a reliable predictor of production efficiency it only tells you the part can be made once, carefully, not that it can be made consistently at scale.
Prototype Geometry Should Reflect Production Intent
Some teams simplify prototype geometry in order to accelerate early development.
However, excessive deviation between prototype and production geometry often hides manufacturability problems until later production stages. Production-intent prototypes provide more reliable validation for tooling strategy, fixture design, machining stability, and tolerance behavior.
This validation process helps expose potential production bottlenecks before volume manufacturing begins and significantly reduces the likelihood of late-stage engineering changes.
Early DFM Validation Reduces Late-Stage Rework
Manufacturing limitations discovered late in a program are dramatically more expensive to correct than the same issue caught early a pattern well known enough in product development to have its own name, the "Rule of 10." A geometry problem that costs a few hours of engineering time to fix at the concept stage can cost roughly ten times as much once a prototype exists, and another order of magnitude beyond that once tooling has been committed.
Features that appear entirely manageable during single-part machining may become unstable during repeat production runs, once fixture wear, tool wear, and operator handoffs enter the picture. Validating manufacturable geometry early improves supplier confidence, stabilizes production planning, and reduces costly redesign cycles that are far cheaper to avoid than to fix after the fact.
Collaboration Between Design and Manufacturing Teams Improves Outcomes
The most successful CNC-ready designs rarely come from a single engineer working in isolation they come from ongoing collaboration between industrial designers, mechanical engineers, machinists, CNC programmers, and quality teams, each catching a different category of problem the others would miss. Manufacturing problems most often occur when design intent develops independently from machining reality, with the two only meeting for the first time once a drawing lands on the shop floor, at which point it's no longer cheap to change course.
Cross-functional communication earlier in the process even an informal conversation with a machinist before a design is finalized improves design decisions while geometry is still easy to change, rather than after it's already locked into a released drawing. Manufacturing engineers and machinists can flag tooling limitations, fixturing concerns, tolerance risks, and accessibility problems well before those turn into expensive revisions, and when that machining expertise reaches CAD development this early, engineering decisions end up grounded in production reality rather than theoretical capability alone reducing unnecessary complexity while improving machining efficiency, repeatability, and long-term production reliability.
The CNC-Ready Parts Checklist
Everything above comes down to a manageable set of thresholds. Before a design goes anywhere near a machinist, run it against the table below.
Category | Design Element | Guideline / Threshold | Why It Matters |
Wall Thickness | Aluminum minimum wall | 0.8 mm standard; down to 0.5 mm in tightly controlled setups | Below this, chatter and deflection are hard to control regardless of strategy |
Wall Thickness | Stainless steel / titanium minimum wall | 1.0 mm minimum | Higher stiffness needed at equivalent thickness than aluminum |
Wall Thickness | Engineering plastics (ABS, POM, PEEK) minimum wall | 1.5–2.0 mm | Plastics deform more readily under cutting and clamping load |
Wall Thickness | Unsupported wall height-to-thickness ratio | Caution above 8:1; impractical above 15:1 | Beyond these ratios, deflection and chatter compromise dimensional consistency |
Tolerances | Standard vs. tight tolerance cost | ±0.1 mm → ±0.005 mm can raise cost 2–5x | Slower passes, added finishing, and heavier inspection all stack up |
Tolerances | Thermal expansion to account for (aluminum) | ~23 µm/m°C | Small temperature swings during machining or inspection shift measurements on tight-tolerance parts |
Tolerances | Where to apply tight tolerances | Assembly fits, motion control, sealing surfaces, mechanical interfaces only | Everywhere else, a standard commercial tolerance is correct, not a compromise |
Tolerances | Datum structure | Base on functional references, per ASME Y14.5 | Misaligned datums cause machining setups and inspection fixtures to disagree |
Cavities & Corners | Pocket depth-to-tool-diameter ratio | Keep at or below 4:1 | Beyond this, deflection, chatter, and chip evacuation all become significant risks |
Cavities & Corners | Cost of going deeper | 6x diameter can take ~4x longer to machine than 3x diameter | Reduced spindle speed and lighter passes are needed to hold accuracy at that reach |
Cavities & Corners | Internal corner radius | At least 1.3x the cutter radius (e.g., 2.6 mm radius for a 2 mm tool) | Sharper corners force smaller, weaker tools and slower toolpaths |
Cavities & Corners | Undercuts | Adds roughly 30–50% to machining cost vs. a standard pocket | Often requires specialty tooling, extra setups, or multi-axis strategies |
Conclusion
Wall thickness, tolerances, and cavity geometry aren't isolated design details they're manufacturing decisions that directly shape machining stability, inspection reliability, cost, and scalability. Strong design for manufacturability turns CNC-ready parts from theoretical CAD models into production-capable ones: balanced walls improve rigidity, realistic tolerances cut unnecessary complexity, and accessible cavities with properly sized radii keep tooling engaged and cutting predictable. The most successful CNC-ready parts aren't the most complex designs. They're the ones that balance engineering intent with manufacturing reality from the very beginning.
If your CNC components contain thin walls, deep cavities, tight tolerances, or difficult-to-machine internal features, now is the time to check whether those geometries actually support efficient production. The highest manufacturing costs are usually locked into a design long before the first setup is even prepared.
Vulcury helps engineering teams strengthen design for manufacturability by reviewing wall thickness strategies, tolerance allocation, cavity accessibility, tooling engagement, and production scalability before parts reach the shop floor.
Reduce machining risk. Improve production repeatability. Minimize costly redesign cycles. Accelerate the transition from prototype to production.
Strong machining performance begins long before the first spindle starts rotating. It begins during design.
Frequently Asked Questions
1. What makes a part truly CNC-ready for manufacturing?
A CNC-ready part is designed not only for functionality but also for efficient machining, inspection, and production scalability. Factors such as wall thickness, cavity accessibility, realistic tolerances, tool reach, and workholding requirements must all be considered during the design phase to ensure stable and cost-effective manufacturing.
2. How does wall thickness affect CNC machining performance?
Wall thickness directly impacts rigidity, vibration resistance, and dimensional stability during machining. Walls that are too thin can deflect, chatter, or deform under cutting forces, while excessively thick sections increase machining time, material removal requirements, and thermal buildup. Balanced wall thickness helps improve machining consistency and production efficiency.
3. Why do unnecessarily tight tolerances increase manufacturing costs?
Tight tolerances often require slower machining speeds, additional finishing passes, more advanced inspection procedures, and tighter process control. Unless a feature has a specific functional requirement, over-tolerancing can significantly increase machining and quality-control costs without improving product performance.
4. How can cavity design improve CNC machining efficiency and manufacturability?
Well-designed cavities allow proper tool access, maintain tool rigidity, and support effective chip evacuation. Features such as realistic cavity depths, accessible geometries, and properly sized internal corner radii help reduce machining time, improve surface finish, extend tool life, and simplify production scaling.