
DFM Tips to Drastically Reduce Your Production Costs
As designers, we often obsess over form, user experience, novelty but too often leave manufacturing and cost implications to later phases. Yet production cost is determined early in the design process. In fact, many studies suggest that 70% (or more) of a product’s eventual manufacturing cost is locked in during the design stage. If you treat costs as an afterthought, you’ll end up sacrificing your margins or forcing expensive redesigns later.
Design for Manufacturability (DFM) is the mindset shift: you design with production in mind from day one. In this article we’ll share practical DFM tips through a designer’s lens not just for engineers so you can reduce costs without compromising aesthetics, brand identity, or user experience.
What is DFM (and why should designers care)?
The design-cost linkage: why your sketches determine cost
Every line, radius, wall thickness decision ripples downstream: tooling, cycle times, quality tolerances, scrap rates. Because of that, design decisions early make or break profitability. Some literature even argues 80% of cost reduction potential depends on part geometry during concept design.
From the designer’s point of view, that means: your creative intent and visual language must also carry manufacturability constraints in parallel. You’re not surrendering art to engineering rather, you're co-inventing the shape vocabulary that behaves well in production.
Core principles designers must internalize
Before diving into tips, here are a few guiding principles (drawn and adapted from classic DFM teachings) that should underlie any practical decision:
- Simplicity over complexity: all else being equal, fewer features, fewer interfaces, less machining, fewer unique molds are best.
- Standardization and reuse: reuse components, fix to catalog parts, constrain custom geometry to limited variants.
- Align function and form with ease of manufacturing: design with process in mind (injection molding, machining, sheet metal, etc.).
- Design tolerances consciously: don’t over-tighten tolerances unless absolutely required.
- Early collaboration and feedback loops: involve manufacturing, tooling, vendors early so design doesn’t evolve in isolation.
These principles help ensure that cost reduction is baked in, not grafted on after design freeze.
Trustbridge Tip: Strong design outcomes start with understanding manufacturing constraints early. Before submitting your next prototype, make sure your CAD, tolerances, and material choices align with manufacturability best practices. Need expert feedback? Explore how Trustbridge’s DFM team helps refine your design before production bottlenecks appear.
DFM Tips to Slash Production Cost (Designer-Centric)
Below are concrete design tactics you can adopt, structured from higher-level decisions to fine detail. Each tip is viewed through a designer’s lens on how to preserve aesthetic freedom while driving down cost.
1. Reduce part count and merge functions
One of the most powerful cost levers is consolidation. Every extra part means more tooling, more assembly, more handling, more inventory, more risk.
- Look for parts that can be combined: can two covers be merged into one? Can a structural rib double as a heat sink?
- Use multifunctional geometry structural, thermal, or fastener roles built into surfaces rather than discrete elements.
- Modularize thoughtfully: design for reuse of modules across product variants to amortize tooling cost. Recent research into modular mechanism design suggests optimized modularization can balance economy of scale with performance consistency.
From a designer’s point of view: don’t view each part as a blank slate treat them as “modules with constraints.” In your sketching or ideation phase, you might sketch the product as a minimal set of primitives (shell + core + interface) with fewer joins. That gives you more freedom to optimize costs later.
2. Choose manufacturable, cost-friendly geometry
The most beautiful shape might kill your budget if it forces exotic operations. Some geometry tweaks can save big:
- Favor simple geometries (straight walls, gentle curves) over dramatic freeform surfaces in cost-critical parts.
- Avoid deep cavities, undercuts, non-orthogonal surfaces unless essential.
- If injection molding, provide proper draft angles, uniform wall thickness, avoid sharp corners, design for ejection (e.g. strategic ejector pin allowances) (AMS)
- Minimize number of tool changes in machining: avoid features that demand five-axis turning where 3-axis or 4-axis would suffice.
- In sheet metal, bendable forms are preferred over stamping that needs complex dies.
- For additive or hybrid manufacture, be mindful of overhanging geometry, support structures, and build orientation (they all add time and cost).
As a designer, you can create parametric “safe geometry zones” in your templates surfaces that respect manufacturability envelopes. During ideation, you can quickly flag shapes that risk expensive downstream operations.
3. Tolerance discipline and dimension budgeting
Designers often overestimate how tight tolerances must be. Overly tight tolerances force slower machining, increased inspection, more rejects, and more cost.
- For non-critical surfaces, assign looser tolerances (e.g. ±0.1 mm vs ±0.02 mm).
- Make critical tolerances only were interfaces demand geometry precision, not for aesthetic flourish.
- Use a “tolerance budget” approach: assign tolerances by functional zones, not globally tight everywhere.
- Use GD&T (geometric dimensioning and tolerancing) thoughtfully, not as a blanket safety net.
- Include tolerance stack analysis early so you see how variation accumulates.
From a designer perspective, you can collaborate with your tolerancing engineer early and overlay tolerancing “heat maps” on your conceptual drawings. That ensures your aesthetic compromises respect functional limits.
4. Design for tooling, ease of tooling and process friendliness
Much of the cost is buried in tooling. Designing with tooling constraints in mind can save enormous amounts.
- Ensure uniform wall thickness to reduce cooling/welding challenges in molds.
- Avoid excessive thickness variation, which can lead to sink, voids or warpage.
- Respect mold line constraints: place parting lines where they least interfere with visual surfaces.
- Use draft angles and radii to ease release and tool life.
- Minimize undercuts or side pulls — if you need them, group them into minimal use or use collapsible cores.
- Provide grip or handling features for robotic or automated handling (ejector pins, locating features).
- For injection molded parts, ensure gate position, venting, and flow paths are feasible.
- Think ahead: cost of tool repair, maintenance, replacement — design robust tooling zones.
For a designer, this means in your sculpting or styling phase, always keep pockets or faces aligned with tooling orientation, avoid hidden undercuts unless absolutely needed, and sketch tooling-neutral aesthetics (so you can tweak splits or parting lines later without destroying the look).
5. Material selection and alternatives
Material choice is one of the biggest levers for cost, weight, logistics, and manufacturability.
- Favor readily available, off-the-shelf materials over exotic ones unless the value return justifies it.
- Use materials whose processing is well understood in your region (for supply chain compatibility).
- Consider composite, fiber, hybrid materials if they provide strength at less weight, provided tooling and process overhead isn’t excessive.
- Use newer methods like tailored fiber placement (TFP) in composites, which can reduce waste and align fibers only where needed, cutting material and processing cost.
- Always evaluate trade-offs: cost vs strength vs manufacturability vs logistics.
When designing, you can embed alternate material variants in your concept models (e.g. “this part in ABS vs in nylon”) and simulate cost impacts. That helps you see the aesthetic/structural cost tradeoffs early.
6. Early prototypes, simulation and iteration
Design innovations always carry risk. The more you validate early, the fewer surprises and expensive fixes down the line.
- Use rapid prototyping (3D printing, soft jigs) to validate form, fit and function before tooling.
- Perform simulation (mold flow, structural FEA, thermal analysis) to detect issues like warpage, stress concentrations, shrinkage.
- Run “what-if” variants to compare cost, manufacturability, and visual tradeoffs.
- Iterate quickly: shift from heavy late-stage changes to incremental adjustments in early design sprints.
As a designer, think of prototype cycles as part of your creative process — not a burden. Early prototypes let you test aesthetic, ergonomics, and manufacturability simultaneously, reducing surprises later.
7. Partner with manufacturers and suppliers early
One of the most underutilized cost levers is supplier insight manufacturing partners often hold the “secret sauce.”
- Involve tooling vendors, contract manufacturers, and fabricators in concept reviews.
- Ask for cost feedback, manufacturability flags, alternative process suggestions.
- Use supplier audits and benchmarking: compare multiple vendors for cost, quality, flexibility.
- Negotiate design-for-cost (DFC) reviews or design assistance agreements.
- Align design cycles to vendor capacity and lead time constraints.
From your vantage point, treat manufacturers as creative collaborators rather than downstream “contractors.” Use their insight to nudge your design decisions earlier — e.g. “if I move this split to here, your tool life improves, cost reduces by 5%”.
Trustbridge Tip: Want expert help in bridging design to supplier reality? Check out Trustbridge’s integrated design and DFM services, which help embed manufacturability, cost insight and supplier alignment right into your design process: Trustbridge Design and DFM Services
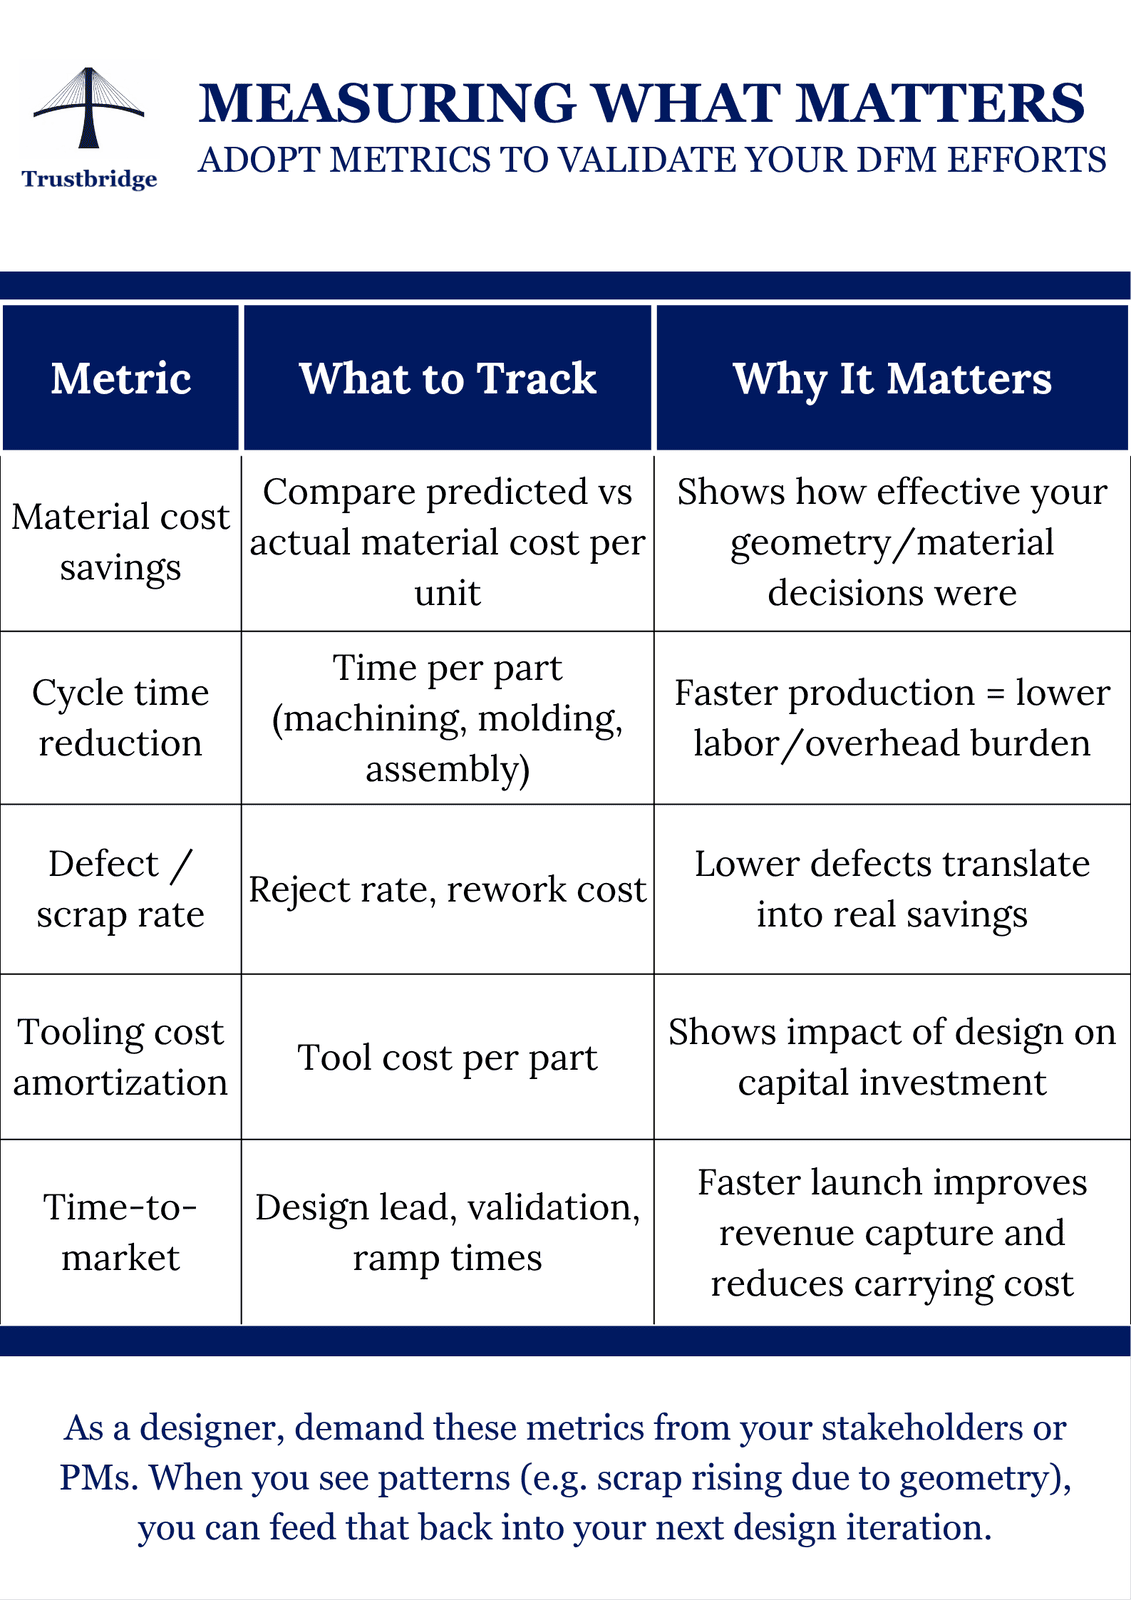
Quantifying Impact and Case Studies
Real results: cost savings, time gains
- In one industrial gearbox housing, applying DFM (simplifying geometry and leveraging local machining) cut cost per unit from $150 → $120 (a 20 % reduction). (Engineering LibreTexts)
- In consumer electronics, DFM-based adjustments (reducing ribs, optimizing ejector surfaces) yielded material and weight reduction while improving manufacturability. (Wevolver)
These numbers suggest that good DFM is not just cost avoidance — it’s margin expansion.
Overcoming Challenges and Mindset Shifts
1. Resistance to constraint vs creativity
Designers often see constraints as limitations. But the DFM lens forces you to see constraints as creative boundaries. Embrace the challenge: within manufacturable envelopes, you can still deliver expressive forms. Over time you’ll internalize “cost grammar” as part of your aesthetic vocabulary.
2. Balancing trade-offs
You’ll often face tradeoffs: cost vs appearance, rigidity vs flexibility, standard parts vs custom. The art is in making smart compromises, not blindly optimizing one dimension. Use data, prototype feedback, and vendor insight to balance.
3. Change management and culture
Turning DFM into habit requires cultural shift. Encourage early cost reviews, hold “DFM design crits,” reward design decisions that save cost, and embed cost awareness into briefs. Over time your design team, engineering team, and manufacturing team will speak a shared language.
4. Tool support and automation
DFM tools, cost estimation software, simulation environments are your allies. For instance, advances in ML-based cost prediction from CAD geometry (e.g. predicting cost from drawing features) are emerging. Use them to spot expensive geometry early. But tools don’t replace judgment you still must interpret the flags and make design calls.
Trustbridge Tip: Simplify your part design to cut manufacturing costs, less complexity means fewer setups, lower labor, and faster production. Read the full blog to learn more.
Conclusion
DFM is not just an “engineering thing” it’s a powerful mindset and toolkit for designers who want both aesthetic excellence and cost efficiency. By internalizing manufacturability early reducing part count, choosing geometry wisely, managing tolerances, collaborating with manufacturers, and iterating fast you can drastically cut production costs while maintaining design integrity and protecting margins.
Great design doesn’t have to come at a high manufacturing cost. When creativity meets manufacturability, the result is not compromised its smarter innovation that’s ready for scale. Start designing with production in mind from the first sketch, and you’ll not only save cost but also gain the ability to deliver high-quality products faster and more sustainably.
Ready to move your procurement from spreadsheets to strategy? AI is no longer optional — it’s the backbone of modern buying. Empower your procurement team with intelligent sourcing, real-time spend visibility, and smarter decision-making. Visit Trustbridge.pro to explore buyer resources, case studies, and solutions designed to help procurement professionals lead with confidence.
FAQs
1. What is Design for Manufacturability (DFM) and why is it important for designers?
Design for Manufacturability (DFM) ensures that a product is designed in a way that simplifies manufacturing, reduces cost, and minimizes errors during production. For designers, it’s critical because around 70% of a product’s final cost is determined in the design phase. Integrating DFM early allows designers to balance creativity with practicality and ensure designs can be produced efficiently without losing aesthetic value.
2. How can DFM help reduce production costs?
By focusing on manufacturable geometry, optimizing part count, choosing cost-effective materials, and involving suppliers early, DFM helps cut tooling, labor, and assembly costs. For example, simplifying part geometry or reusing standard components can reduce machining time and eliminate unnecessary complexity — directly lowering overall production expenses.
3. Can DFM limit a designer’s creativity?
Not at all. In fact, DFM can enhance creativity by introducing productive constraints. Designers can explore innovative shapes, materials, and assembly methods within manufacturable limits. It’s about working smarter — designing for both artistic impact and real-world feasibility. Many world-class products achieve iconic designs precisely because they adhere to strong DFM principles.
4. What tools or methods can designers use to implement DFM effectively?
Designers can leverage CAD-integrated simulation tools, cost estimation software, and collaboration platforms for early vendor input. Rapid prototyping methods like 3D printing or CNC mockups allow testing form, fit, and manufacturability before mass production. Partnering with DFM consultants or specialized services also helps refine designs for optimal cost and performance.